Part 4. SQL & Analysis Fundamental Concepts
- Norma López-Sancho
- Apr 13, 2024
- 4 min read

We are going to wrap up what we have been working with on Parts 2 & 3 using an index table this time to expand the concept a bit further.
In part 1 we created (but did not play with) a junction table for employee_department for a scenario in which the company has employees that work on several departments
On cases like this, you don’t want to have multiple values for same employee in your employee table just to reflect the different department_ids which this employee works for.
For many-to-many relationships in a database you need this junction tables to express the complexity of the business.
So how would this table work? And how do we later on extract the data?
First we will create our table and fill it with data, then we will play with different queries to Join this table to our department & employee tables, because and index table is basically a relation of numbers, X employee_id, will be related to X department_id, and you will need to know who is the employee and what department is that.
If you need more background on what each part of the statement means and what is it for, I recommend you to visit Part 1 where you have a breakdown.
1. Creating the table
CREATE TABLE employee_department (
    employee_id INT,
    department_id INT,
    created_at TIMESTAMP DEFAULT CURRENT_TIMESTAMP,
    updated_at TIMESTAMP DEFAULT CURRENT_TIMESTAMP ON UPDATE CURRENT_TIMESTAMP,
    PRIMARY KEY (employee_id, department_id),
    FOREIGN KEY (employee_id) REFERENCES employees(employee_id),
    FOREIGN KEY (department_id) REFERENCES department(department_id)
);
2. Inserting data in the table
2.1 Manual insert
This approach is great if you have just a handful of records to update, and you don’t have a good script on hand. Will get things done pretty quick!
INSERT INTO employee_department (employee_id, department_id)
VALUES
	(your_employee_id1, your_department_id1)
	(your_employee_id2, your_department_id2)
	(your_employee_id3, your_department_id3)
2.2 Load the data from a .csv file
As we have seen in Part 2 and 3, consists on creating the table in a spreadsheet > converting it to a CSV file > inserting the file in our docker container > update our table with that file
One of our previous scenarios was to use this both having an empty table that you are filling for the first time (A) or updating missing data over pre-existing records of the table (B)
A. Directly loading data into the table (empty table)
B. Using a temporary table to load the data and then JOIN with your table to bring the data into it (if table has existing records)
In this new case study, one of our scenarios is coincidental: A (which we will review now)
But the second (C to avoid getting them mixed) will be inserting new rows onto a table with data, this scenario will be sweet, I promise
Let’s get down to business!
First create the spreadsheet with the data for our table and convert it to a .CSV file
If you following along, create 2 files:
For scenario A:
We will create a .csv with some employee_id and department_id relations
For scenario C:
Same but with the remaining records we want to insert.
As usual, we need to understand how the .csv is formatted, because our statements will depend on it:
FIELDS TERMINATED BY ','  -- for how columns are separated
ENCLOSED BY '"' -- if data within each column is expressed “like this”
LINES TERMINATED BY '\n' -- for how each row is terminated
If you are not working on a docker container, check the .csv on any text editor/notepad.
Otherwise, import your .csv within your permitted folder in the container and take a peak on the file editor (in Part 2 we go through the steps of find our permitted folder)
So this is how the file looks in my container, therefore we will only need FIELDS TERMINATED BY clause with this as the separator ';'

As we saw in Part 2, because Numbers app for Mac creates the extra semicolons on the .csv when there are empty columns in the original spreadsheet (Excel does not do that).
And we already know this will throw a:
Error Code: 1262. Row 1 was truncated; it contained more data than there were input columns
Oh my, not this again! Let’s make sure our .csv looks like this, no semicolons at the end:

Now that we are set:
A. Loading data into our empty employees_department index table
-- Use the CSV file in our container to update the empty table
LOAD DATA INFILE '/var/lib/mysql-files/employee_department_empty_table.csv'
INTO TABLE employee_department
FIELDS TERMINATED BY ';'
IGNORE 1 LINES(employee_id, department_id)
And here we have:

C. Inserting more values in our employee_department table that is not empty anymore
I did say this would be sweet, right? Well, here we go, exact same code, we just changing the file path:
LOAD DATA INFILE '/var/lib/mysql-files/employee_department_non_empty_table.csv'
INTO TABLE employee_department
FIELDS TERMINATED BY ';'
IGNORE 1 LINES(employee_id, department_id)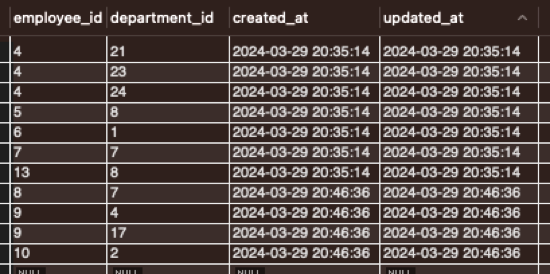
Easy peasy! And yes, it was a bit of a trick on my side but we are trying to make a point
This would make an excellent script, you can always keep the same file name, something like ‘Update_whatever_table.csv’, and the end user (you or others) would only create the .csv, importing it overwriting the previous one, and run a concise & quick pre-written statement, voilà!
No more LOAD DATA INFILE in the next part, we promise! We will navigate the concept of JOINs next.
Until then, Happy Coding!


Comments